
Cheesecake is my favorite! And just to be clear… I would enjoy it, no matter what the cake looks like.
Having one that is bright, festive, and pretty is just extra sweet. This rainbow cheesecake is a fun way to dress up a favorite treat, making it instantly ready for spring parties, Easter, and showers.
See my hack below for keeping the colors separate while they set.
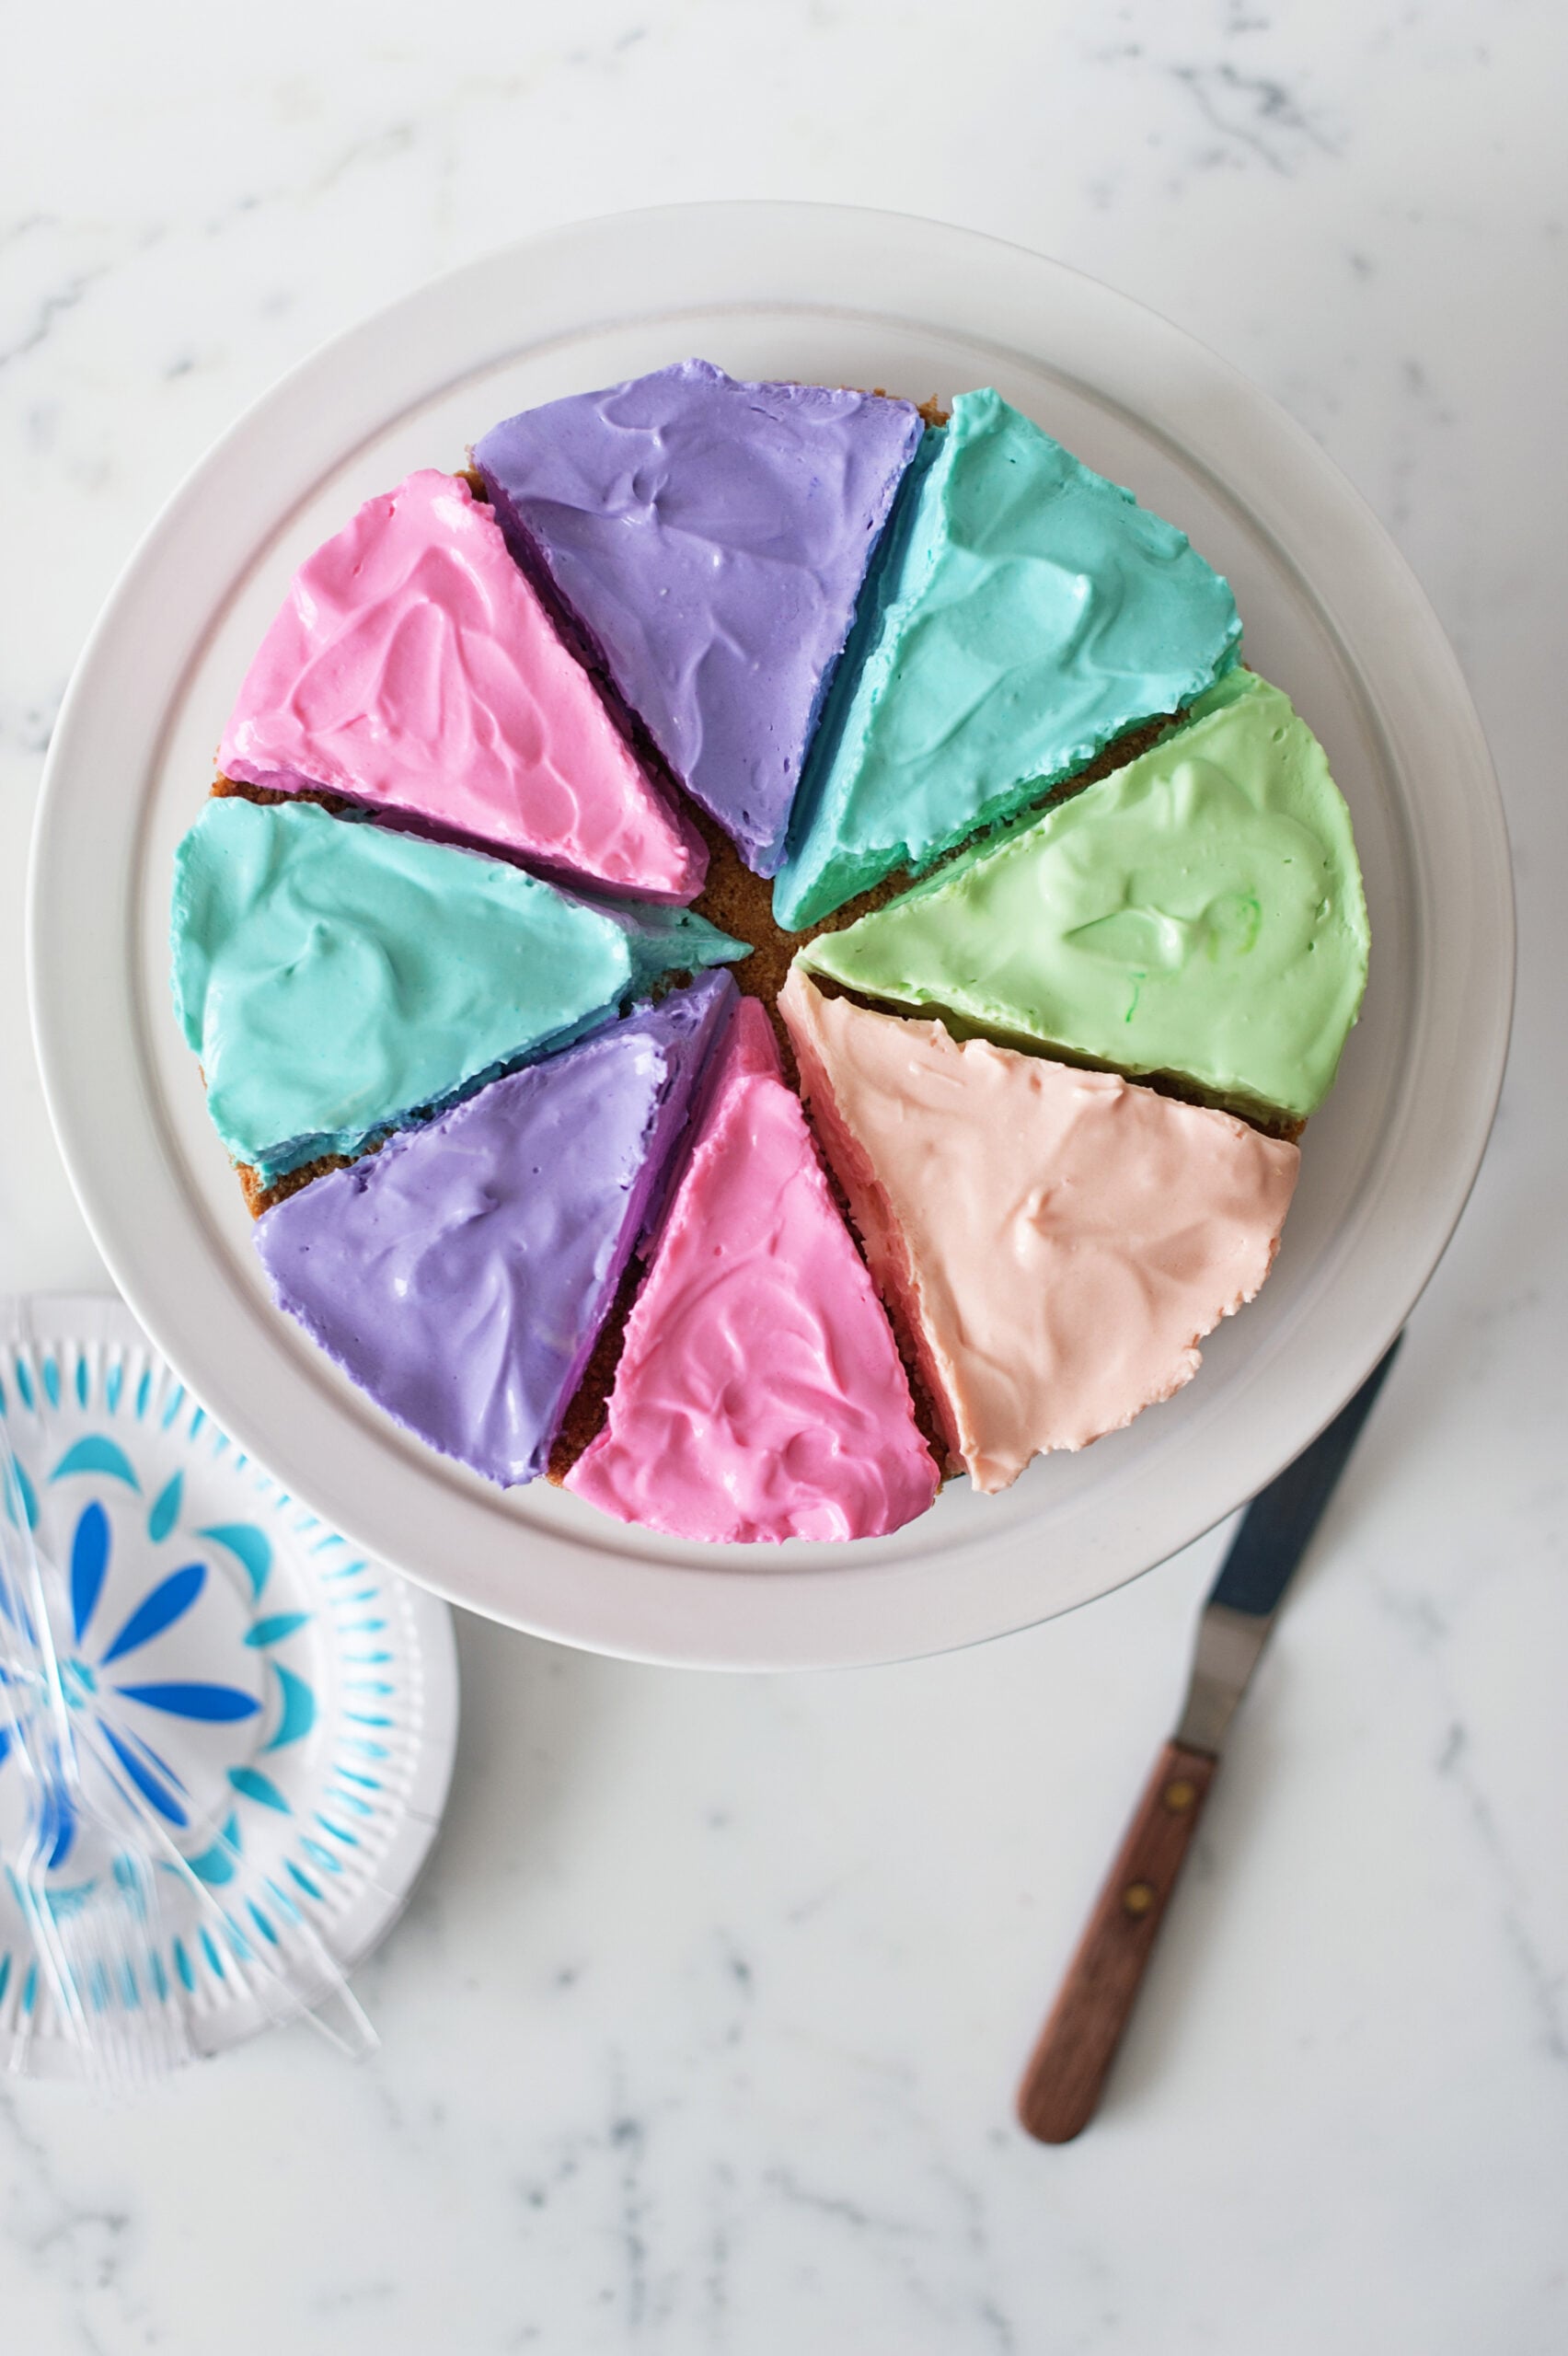 The colors can be adjusted to any combination you can dream up, though this tasty take on a pastel rainbow is easily my pick.
And the cake doesn’t need to go in the oven at all! Awesome, for an easy summer birthday.
The colors can be adjusted to any combination you can dream up, though this tasty take on a pastel rainbow is easily my pick.
And the cake doesn’t need to go in the oven at all! Awesome, for an easy summer birthday.


 Next, it’s time to make the cheesecake! For this easy no-bake cheesecake recipe in the recipe box above.
Fill the wells, alternating the colors as you go. For repeating colors, go around once with different colors, then start over with the same pattern until you’ve run out of filling.
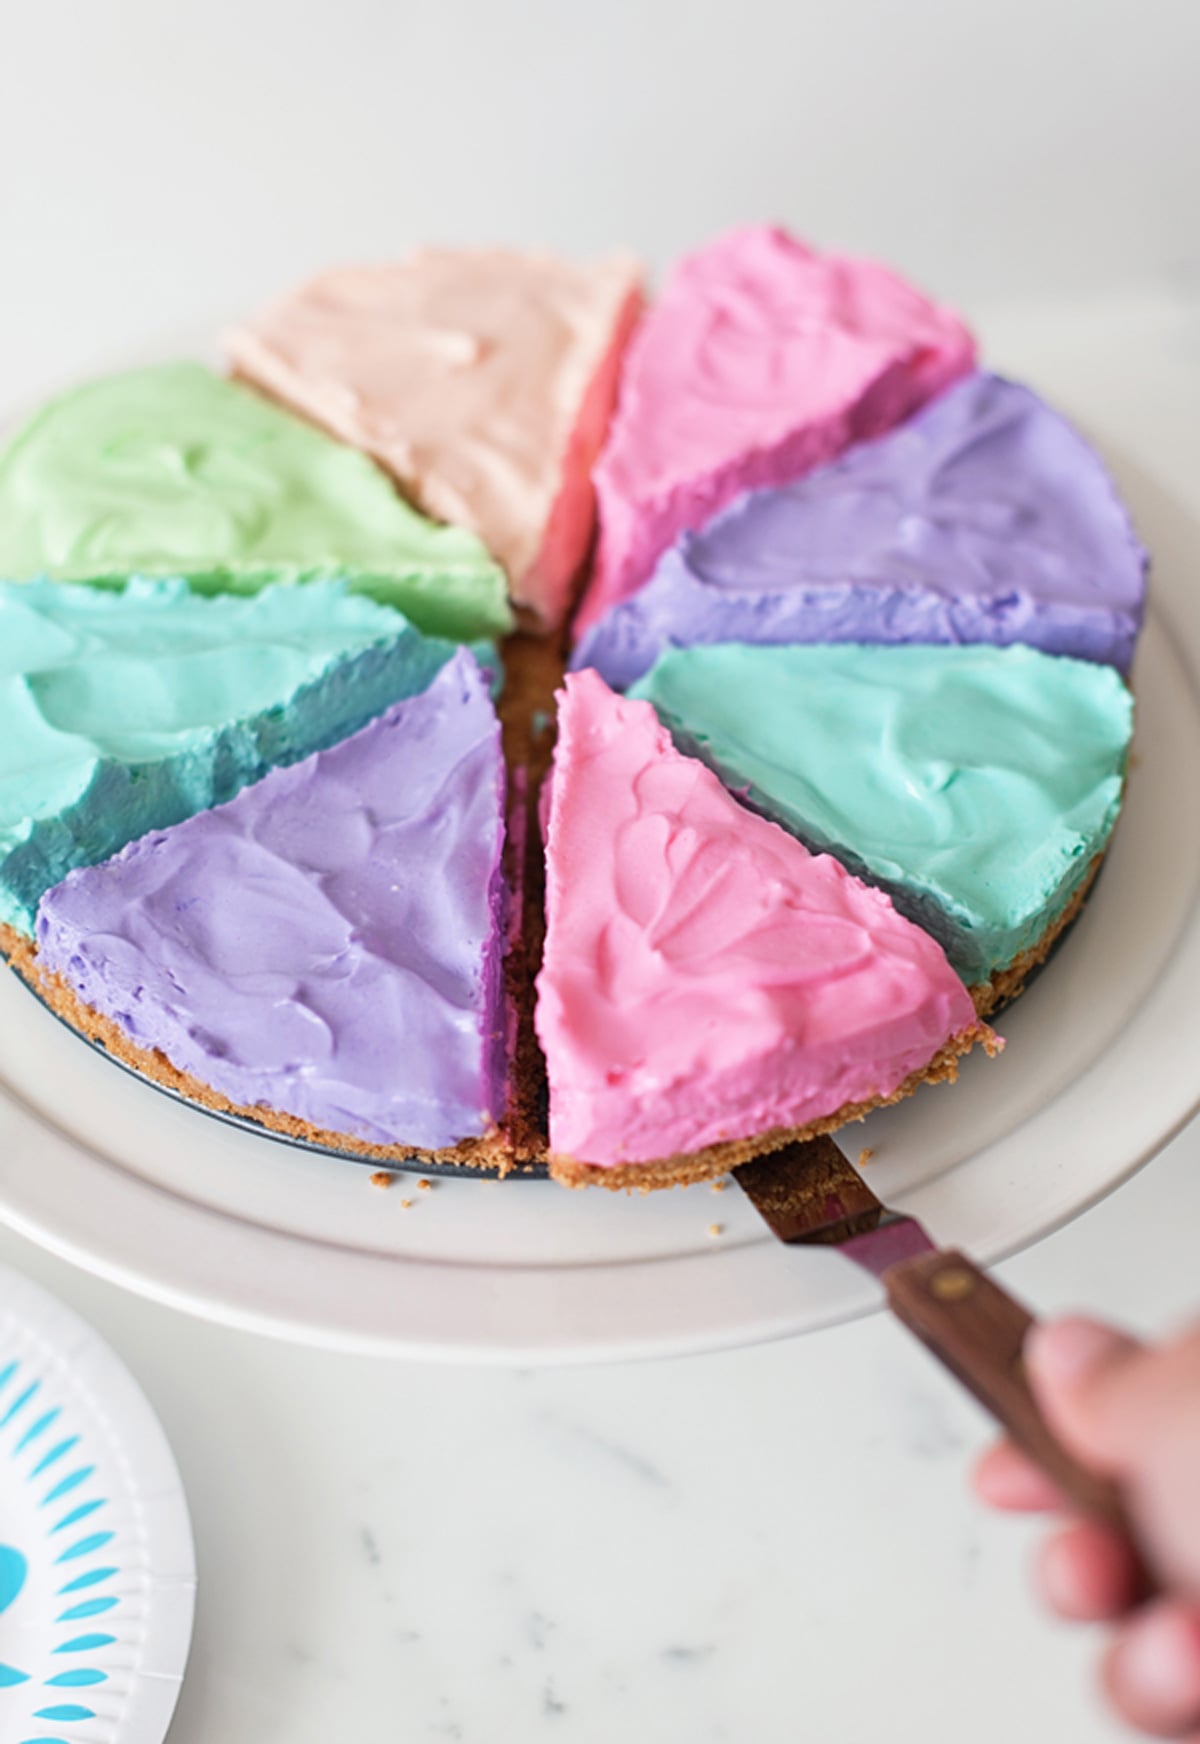
Once your cake is set, clasp the side of the pan and remove the cheesecake. Carefully lift the foil-covered cardboard pieces from the cheesecake.
Cut the slices with a sharp knife. Serve and enjoy!
Photography by Athena Plichta.
Next, it’s time to make the cheesecake! For this easy no-bake cheesecake recipe in the recipe box above.
Fill the wells, alternating the colors as you go. For repeating colors, go around once with different colors, then start over with the same pattern until you’ve run out of filling.
Once your cake is set, clasp the side of the pan and remove the cheesecake. Carefully lift the foil-covered cardboard pieces from the cheesecake.
Cut the slices with a sharp knife. Serve and enjoy!
Photography by Athena Plichta.
The colors can be adjusted to any combination you can dream up, though this tasty take on a pastel rainbow is easily my pick.
And the cake doesn’t need to go in the oven at all! Awesome, for an easy summer birthday.
Rainbow Cheesecake
A pretty pastel raibow cheesecake for spring, no baking necessary.
- 9″ springform pan
- Cardboard sheet (we had a 16″ high by 13″ wide sheet)
- Scissors
- Ruler.
- 20 Sheets graham crackers
- 11 tbsp Unsalted butter (melted)
- 2 tbsp Sugar
- 2 8 oz packages Cream cheese (room tempature )
- 1 14 oz can Sweetened condensed milk
- 1/4 cup Fresh lemon juice
- 1 tsp Vanilla extract
- Food coloring in rainbow colors
- Put graham crackers in a large resealable plastic bag, and crush them with a rolling pin until very fine crumbs form. Pour crumbs into a medium bowl; stir in sugar. Add melted butter, and stir until well combined.
- Press the crumb mixture into a 9-inch springform pan, spreading it 1-1/2 to 2 inches up the side; press flat. Chill crust in freezer at least 10 minutes, or overnight in the fridge.
- Make the filling. Using an electric mixer (or stand mixer with paddle attachment) beat the cream cheese in a large bowl at medium high speed until smooth. Beat in the condensed milk a little at a time, scraping the sides of the bowl as necessary. Beat in the lemon juice and vanilla.
- Divide the batter equally into 8 different bowls. Alternately, for our cheesecake, we wanted 5 different colors of cheesecake, 3 of which would be repeated in the cake. So we doubled the amount for 3 bowls (which equals 6 parts of the filling) and then a single amount for 2 bowls (which equals the remaining 2 parts of the filling).
- Squeeze a few drops of food coloring gel into a bowl and stir well with a spoon until color is evenly distributed. Repeat with the remaining bowls.
- You’re ready to fill your pan with cheesecake filling. Start with the first color, pouring it into the well. Smooth the top as much as possible, using an offset spatula, small rubber spatula, or the back of a spoon. If you’re using a color twice, pour half of the batter from the bowl, reserve the rest for the second time you get to the color.
- Fill the remaining wells, alternating the colors as you go. For repeating colors, go around once with different colors, then start over with the same pattern until you’ve run out of filling.
- Cover the pan with plastic wrap, and refrigerate until firm, 3 hours or overnight.
Note: We were able to create this color wheel by separating the cheesecake slices during the cake’s creation. Read on to see how we created this template.
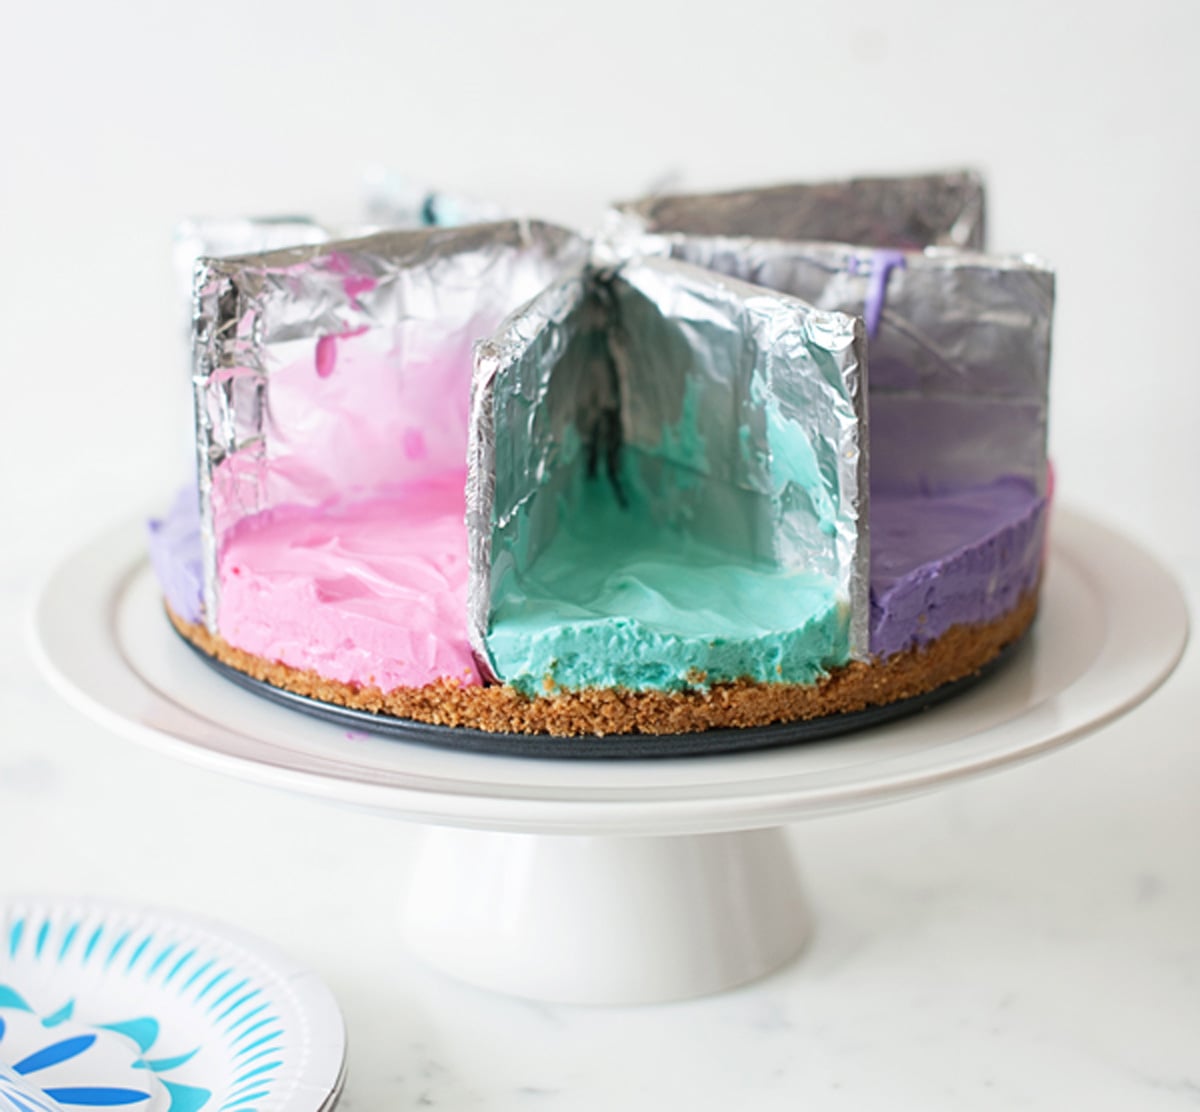
How to make the rainbow cheesecake filling divider
We were able to create this rainbow-colored cheesecake by separating the cheesecake slices during baking. To make dividers that will do this:- Measure a strip of cardboard to a length just under the diameter of the cheesecake pan, around 8-1/2″ to 8-3/4″.
- The width of each strip should be around 3 inches. Cut out cardboard; repeat 3 more times with these same dimensions.
- Mark the halfway point on all four of the cardboard pieces. With scissors, cut about 3/4 of the way up on two of the cardboard strips.
- For the other two pieces, cut them in equal halves; you’ll end up with 4 smaller pieces measuring anywhere between 4″ to 4-1/4″ in length.
- Fit the two longer pieces of cardboard to form an “X” by sliding the cut pieces together. Make sure the assembled piece fits in the pan; center the “X” in the pan so there are four equal quadrants.
Note: I covered the cardboard in foil, and needed to snip off a bit of cardboard from the ends to make it fit.Ensure that the smaller pieces of cardboard also fit, placing them in each quadrant so there are now 8 wells for the slices of cheesecake. Cover the cardboard pieces completely with foil, trying to keep edges smooth and flat. For the two longer pieces, snip the centers, following the earlier cut in each piece. Assemble by fitting the “X” into the pan, leaving it uncovered, then placing the covered small 4 pieces next.
 Next, it’s time to make the cheesecake! For this easy no-bake cheesecake recipe in the recipe box above.
Fill the wells, alternating the colors as you go. For repeating colors, go around once with different colors, then start over with the same pattern until you’ve run out of filling.
Once your cake is set, clasp the side of the pan and remove the cheesecake. Carefully lift the foil-covered cardboard pieces from the cheesecake.
Cut the slices with a sharp knife. Serve and enjoy!
Photography by Athena Plichta.
Next, it’s time to make the cheesecake! For this easy no-bake cheesecake recipe in the recipe box above.
Fill the wells, alternating the colors as you go. For repeating colors, go around once with different colors, then start over with the same pattern until you’ve run out of filling.
Once your cake is set, clasp the side of the pan and remove the cheesecake. Carefully lift the foil-covered cardboard pieces from the cheesecake.
Cut the slices with a sharp knife. Serve and enjoy!
Photography by Athena Plichta.